文章目录
  1. 1. 节流
    1. 1.1. 初始代码
    2. 1.2. 原理
    3. 1.3. 举例
    4. 1.4. 实现
      1. 1.4.1. 时间戳方式
      2. 1.4.2. 定时器方式
      3. 1.4.3. 对比
    5. 1.5. 优化
      1. 1.5.1. 添加可配置项
      2. 1.5.2. 添加取消
    6. 1.6. 总结

节流

上一节我们一起实现了《JS事件防抖(Debounce)》,本节来实现一下JS事件的节流(Throttle)。

初始代码

本节我们继续延用上一节的初始代码,不过为了更加清楚的看到事件的调用次数,我们添加了一个times参数显示到页面上。

1
2
3
4
5
6
7
8
9
10
11
12
13
14
15
16
17
18
19
20
21
22
23
24
25
<!DOCTYPE html>
<html lang="en">
<head>
<meta charset="UTF-8">
<title>Document</title>
</head>
<body>
<input type="text" id="searchName">
<h2 id="times">0</h2>
<script>
// No.1
var userName = document.getElementById('searchName'),
times = document.getElementById('times'),
time = 0;
userName.addEventListener('input', getAjax);
// 通过ajax方法获取模糊搜索数据
function getAjax(e){
console.log('use ajax function', e.target.value, ' time:', new Date().toLocaleTimeString());
times.innerHTML = ++time;
}
</script>
</body>
</html>

输出如下图,每输入一个字符,都会触发ajax方法:

图片1

原理

节流的原理就是:如果持续触发一个事件,在一定的时间内,只会执行一次。

举例

打游戏时,技能的冷却:如果按一下技能键,则技能触发,但是在冷却时间内,即使按了多次该技能键,还是不会触发这个技能,直到技能冷却时间过去,继续按键才可以释放技能。

实现

根据事件首次是否执行和结束后是否执行最后一次事件,我们有两种实现方式。

  • 时间戳方式
  • 定时器方式

时间戳方式

即设置时间戳,当触发事件时,取出当前时间戳,然后减去之前的时间戳,如果时间间隔超出了设定的时间,那就执行函数,并且把时间戳更新为当前的时间戳。如果没有超出设定的时间范围,则不执行事件。

1
2
3
4
5
6
7
8
9
10
11
12
13
userName.addEventListener('input', throttle(getAjax, 5000));
function throttle(fn, wait){
var previous = 0;
return function(){
var now = +new Date(),
_this = this,
args = arguments;
if (now - previous > wait) {
fn.apply(_this, args);
previous = now;
}
}
}

输出结果如下:

图片2

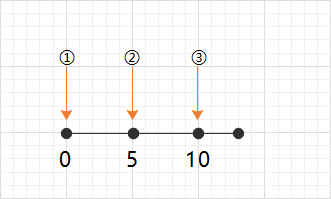
大家可能会纳闷,为什么最后面的三个字符没有触发函数的执行?请看下图:

time图片1

横轴代表随着时间的变化,输入框的输入字符事件一直在触发,但是该事件对应的回调函数却只在触发过程中每隔5秒调用,并且如果在5秒后还有事件的触发,才会重新执行。如果5秒内即使有事件的输入,回调函数还是不会触发。即,事件对应的回调函数首次执行,结束后不执行。

定时器方式

当触发事件的时候,我们可以设置一个定时器,再触发事件的时候,如果这个定时器存在,则不执行函数。直到定时器被清空,才重新设置定时器,并在函数执行完成后,清空该定时器,这样我们就可以设置下一个定时器。

1
2
3
4
5
6
7
8
9
10
11
12
13
function throttle(fn, wait){
var timeTask;
return function(){
var _this = this,
args = arguments;
if (!timeTask) {
timeTask = setTimeout(()=>{
timeTask = null;
fn.apply(_this, args);
}, wait);
}
}
}

输出结果如下:

图片3

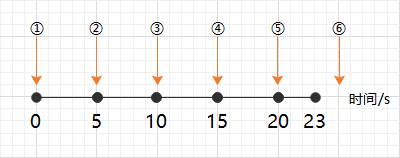
与时间戳方式不同的,就是该事件不会立即执行,而是会等待几秒,然后才会执行,在输入事件停止输入后,还会执行一次,如下图:
time图片2

对比

对比上面这两种方式可以发现,他们各有优缺点:

  • 时间戳方式,第一次事件会立刻触发函数执行;定时器方式的第一次事件在n秒后才会第一次执行
  • 时间戳方式,事件停止触发后无法再执行函数;定时器方式在事件停止触发后,依然会执行一次函数。

所以,我们就需要想办法进行优化,结合两种方式的优点。

优化

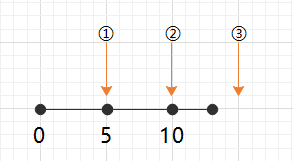
我们需要在事件刚开始的时候立刻触发函数,然后继续触发过程中函数每隔n秒正常执行,然后在事件停止触发后还会再执行一次函数。所以我们改进一下上面的代码,将两者的优点进行合并。

1
2
3
4
5
6
7
8
9
10
11
12
13
14
15
16
17
18
19
20
21
22
23
24
25
function throttle(fn, wait){
var timeTask, previous = 0;
return function(){
var now = +new Date(),
nextExecTime = wait - (now - previous), //下次执行 fn 剩余的时间
_this = this,
args = arguments;
// 如果剩余的时间小于等于0,或者修改了系统时间
if (nextExecTime <= 0 || nextExecTime > wait) {
if (timeTask) {
clearTimeout(timeTask);
timeTask = null;
}
previous = now;
fn.apply(_this, args);
}else if(!timeTask){
timeTask = setTimeout(() => {
previous = +new Date();
timeTask = null;
fn.apply(_this, args);
}, nextExecTime);
}
}
}

此时,事件的执行次数如下图所示:

time图片3

到了这里,其实我们的代码已经是比较完整的了,不过我们还希望更加方便易用,比如有时候希望刚开始时不触发,或者结束后不触发,所以可以把上面的代码再优化一下。

添加可配置项

通过添加一个option参数配置,来设定事件的触发。

1
2
3
4
option = {
leading:false //表示禁用第一次执行
trailing: false //表示禁用停止触发的回调
}

这里需要注意一下,leading: false和trailing: false 不能同时设置。因为如果trailing设置了false,那么停止触发后,就不会设置定时器,所以只要过了设置的时间,然后再重新开始执行的时候,就会立刻执行了,违反了leading: false,这样其实是有bug存在的,所以这两种事件逻辑不可以同时设置。

1
2
3
4
5
6
7
8
9
10
11
12
13
14
15
16
17
18
19
20
21
22
23
24
25
26
27
28
29
30
31
32
// var setThrottle = throttle(getAjax, 5000);
// var setThrottle = throttle(getAjax, 5000, {leading: false});
var setThrottle = throttle(getAjax, 5000, {trailing: false});
userName.addEventListener('input', setThrottle);
function throttle(fn, wait, option){
var timeTask, previous = 0;
if (!options) options = {};
return function(){
var now = +new Date(),
_this = this,
args = arguments;
if (!previous && options.leading === false) previous = now;
var nextExecTime = wait - (now - previous); //下次执行 fn 剩余的时间
// 如果剩余的时间小于等于0,或者修改了系统时间
if (nextExecTime <= 0 || nextExecTime > wait) {
if (timeTask) {
clearTimeout(timeTask);
timeTask = null;
}
previous = now;
fn.apply(_this, args);
}else if(!timeTask && options.trailing !== false){
timeTask = setTimeout(() => {
previous = options.leading === false ? 0 : +new Date();
timeTask = null;
fn.apply(_this, args);
}, nextExecTime);
}
}
}

添加取消

再进行优化一下,类似于上一节的防抖(Debounce),如果设置的时间间隔太长,可能会影响用户体验,所以我们添加一个取消的方法,让用户可以根据需要取消节流。

1
2
3
4
5
6
7
8
9
10
11
12
13
14
15
16
17
18
19
20
21
22
23
24
25
26
27
28
29
30
31
32
33
34
35
36
function throttle(fn, wait, option){
var timeTask, previous = 0;
if (!options) options = {};
var throttled = function(){
var now = +new Date(),
_this = this,
args = arguments;
if (!previous && options.leading === false) previous = now;
var nextExecTime = wait - (now - previous); //下次执行 fn 剩余的时间
// 如果剩余的时间小于等于0,或者修改了系统时间
if (nextExecTime <= 0 || nextExecTime > wait) {
if (timeTask) {
clearTimeout(timeTask);
timeTask = null;
}
previous = now;
fn.apply(_this, args);
}else if(!timeTask && options.trailing !== false){
timeTask = setTimeout(() => {
previous = options.leading === false ? 0 : +new Date();
timeTask = null;
fn.apply(_this, args);
}, nextExecTime);
}
}
throttled.cancel = function(){
console.log('取消节流');
timeTask && clearTimeout(timeTask)
timeTask = null;
previous = 0;
}
return throttled;
}

至此,我们已经完整的实现了事件的节流(Throttle)功能。

总结

完整代码敬上!

1
2
3
4
5
6
7
8
9
10
11
12
13
14
15
16
17
18
19
20
21
22
23
24
25
26
27
28
29
30
31
32
33
34
35
36
37
38
39
40
41
42
43
44
45
46
47
48
49
50
51
52
53
54
55
56
57
58
59
60
61
62
63
64
65
66
67
68
69
70
71
72
73
<!DOCTYPE html>
<html lang="en">
<head>
<meta charset="UTF-8">
<title>Document</title>
</head>
<body>
<input type="text" id="searchName">
<h2 id="times">-1</h2>
<button name="cancel" id="cancelBtn">取消节流</button>
<script>
// No.5
//leading:false 表示禁用第一次执行 trailing: false 表示禁用停止触发的回调
var userName = document.getElementById('searchName');
var times = document.getElementById('times');
var cancelBtn = document.getElementById('cancelBtn');
var time = 0;
var setThrottle = throttle(getAjax, 3000);
// var setThrottle = throttle(getAjax, 5000, {leading: false});
// var setThrottle = throttle(getAjax, 5000, {trailing: false});
// var setThrottle = throttle(getAjax, 3000, {leading: false, trailing: false});
userName.addEventListener('input', setThrottle);
cancelBtn.addEventListener('click', ()=>{
setThrottle.cancel();
});
function throttle(fn, wait, options){
var timeTask, previous = 0;
if (!options) options = {};
var throttled = function(){
var now = +new Date(),
_this = this,
args = arguments;
if (!previous && options.leading === false) previous = now;
var nextExecTime = wait - (now - previous); //下次执行 fn 剩余的时间
// 如果剩余的时间小于等于0,或者修改了系统时间
if (nextExecTime <= 0 || nextExecTime > wait) {
if (timeTask) {
clearTimeout(timeTask);
timeTask = null;
}
previous = now;
fn.apply(_this, args);
}else if(!timeTask && options.trailing !== false){
timeTask = setTimeout(() => {
previous = options.leading === false ? 0 : +new Date();
timeTask = null;
fn.apply(_this, args);
}, nextExecTime);
}
}
throttled.cancel = function(){
console.log('取消节流');
timeTask && clearTimeout(timeTask)
timeTask = null;
previous = 0;
}
return throttled;
}
// 通过ajax方法获取模糊搜索数据
function getAjax(e){
console.log('use ajax function', e.target.value, ' time:', new Date().toLocaleTimeString());
times.innerHTML = time++;
}
</script>
</body>
</html>

感谢收看,本章完!

文章目录
  1. 1. 节流
    1. 1.1. 初始代码
    2. 1.2. 原理
    3. 1.3. 举例
    4. 1.4. 实现
      1. 1.4.1. 时间戳方式
      2. 1.4.2. 定时器方式
      3. 1.4.3. 对比
    5. 1.5. 优化
      1. 1.5.1. 添加可配置项
      2. 1.5.2. 添加取消
    6. 1.6. 总结